Controlling Crawling and Indexing
Before a page can rank it needs to make it into Google’s index. For that to happen, Google needs to be able to crawl it. In this post we examine various ways to control how Google finds and parses your content.
Sitemaps
What Is a Sitemap and What Does It Do?
Think of sitemaps like a quick access directory that Google can use to index your site. It’s a readable file embedded within your domain containing valuable information about your website, such as:
- An index of all the pages on your website
- A directory of videos and files on your website
- Information about how your pages have updated over time
- Whether your site exists in multiple languages
- How long it’s been since your last update
You can have either an HTML sitemap or an XML sitemap. HTML sitemaps help users, whereas XML sitemaps target search engine consoles looking to attract search engine crawlers.
Do You Need a Sitemap?
Be aware that Google can find your site if your pages link together correctly. Is every page on your site accessible via links starting from your homepage? If so, Google Search Console can index your site without an XML sitemap. The same is true if you don’t have a lot of videos or images on your site.
On the other hand, an XML sitemap is extremely helpful for SEO. It can improve your rankings on search engines and increase traffic, especially if you have a large site filled with different kinds of media.
How Do You Build and Submit a Sitemap?
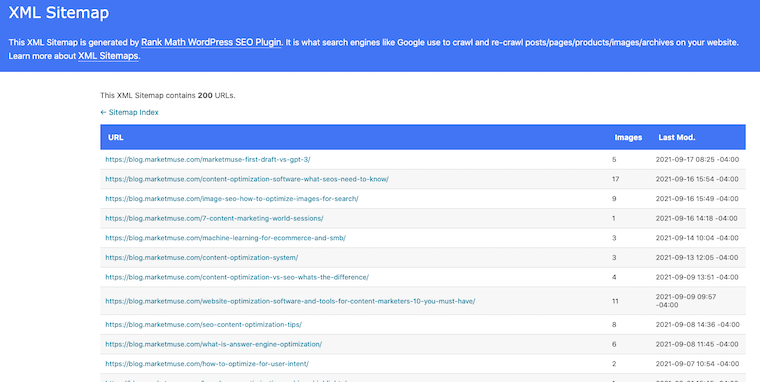
The process for submitting an XML sitemap to Google is going to depend on the kind of site you have. Some content management systems (CMS), like WordPress generate a sitemap automatically.
Here’s what ours looks like.

If you have a relatively small website with only a few pages, you can create your sitemap using a text editor and following Google’s formatting guidelines.
Google won’t check your XML sitemap every time it indexes your website, so if you do make changes to it, you’ll have to update them to let them know.

Using the sitemaps report page to submit your sitemap is probably the best way, but you can also send a GET request in your browser with the command: https://www.google.com/ping?sitemap=FULL_URL_OF_SITEMAP.
Sitemap Extensions
For sites that use videos, images or Google News feeds, you’ll need to modify the syntax in your sitemaps to accommodate them. Each type of media uses its own specific sitemap extension that will help crawlers identify it.
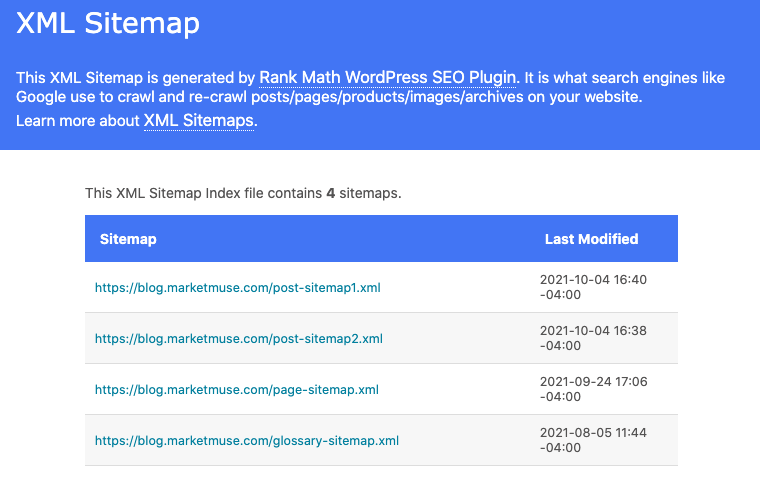
Are you working with an especially large website? You can split up your site into multiple XML sitemaps, and make a sitemap of sitemaps.

But you’ll need to index them in a specific sitemap index file that links your XML sitemaps together.
Robots.txt
What Is a Robots.txt File?
Robots.txt is one of the most important TXT files for your website’s SEO. Consider it essentially a TXT file that tells search engine crawlers which of your sites to index and which to disallow. Google regularly reads robots.txt for directives telling it how to read your website. That means if you have private pages on your site that you don’t want appearing in search engine results, you can use robots.txt to tell Google to disallow them.
However, because you’re relying on a search bot to respect those directives, it’s best to use password protection for confidential pages.
Do you need a robots.txt file? Assuming your pages are properly hyperlinked, Google indexes your site whether you have the TXT file or not. Whether you have the robots.txt file or not, Google disallows duplicate or irrelevant pages from the search results anyway.
But if you have private pages or a lot of pages, you’ll want a robots.txt file on your site. It’ll keep your crawl budget in line and your private pages private.
If you make no changes to your robots.txt file at all, search engines will simply crawl all your websites by default.
How to Create and Submit a Robots.txt File to Google
The first step is simply finding the file. Locate it at your root directory, such as: www.example.com/robots.txt. It’ll contain formatting rules like so:
User-agent : botDisallow : /nobot/
This establishes that the website URL example.com/nobot/ won’t be indexed by the user “bot.”
To Make Your Robots.txt File:
- Use a simplified word editor like Notepad (i.e., nothing that introduces auto-formatting).
- Make sure the TXT file you’re using is UTF-8 encoded or Google may not recognize it.
- As above, begin each line with the “User-agent” line. Each line contains only one directive.
A set of lines together is called a “group,” containing instructions for the user agent you’re targeting, and indicating which directories are accessible and which are disallowed.
Bear in mind that search engine bots read the robots.txt file from top to bottom. Use “#” to write your comments.
Uploading the TXT File to Google
Different website providers upload TXT files to their sites in different ways. If you’re using a CMS like WordPress, review their documentation, FAQs, or forums to find out how robots.txt files are uploaded into a website’s root directory.
Some settings modify the robot.txt file directly, so be careful. If you’re having trouble getting your WordPress site indexed, make sure this checkbox is NOT checked.

You don’t need to do anything else once the file is uploaded. The search engine crawlers will read the TXT file automatically, so pay attention to its impact on your search engine optimization stats.
Meta Tags
Meta Tags Used for Search Engine Indexing
Meta tags are little bits of code embedded into your website that tell Google the information you want it to know. For example, do you want your page displayed in the search engine results in a certain way? That’s controlled with meta tags.
Meta tags are either at the page level or used as inline directives:
- Page-level meta tags: these are the most prominent tags that interface with your website at all levels, including its titles or headings. You add them directly to your website’s HTML pages <head> section.
- Inline directive meta tags: these tags are used to disallow individual parts of an HTML page, using the “data-nosnippet” attribute on targeted HTML tags. These tags are boolean attributes, meaning they ignore whatever values you state within them.
Meta robot tags are the ones that impact SEO, telling search engine bots how to index your site. You can even disallow pages from search engine indexing using a “no index” tag in your TXT file.
Some Commonly Used Meta Tags for Google
- “Description” tag: formatted like
<meta name=“description” content=“text” />, it gives a brief meta description of the page. The snippets you see on the search engine results page will often use description meta tags taken from those individual pages’ HTML files. - “Robots”: formatted like <
meta name=“robots” content=“text” />, this is the all-important tag that precisely instructs google bots in their indexing and crawling. You can use the robots tag<meta name=“googlebot” />to target Google crawlers specifically, but the robots meta tag itself targets all search engine crawlers. - “Google Site Verification”: formatted like
<meta name=“google” content=“text” />, this meta tag is used to show who the owner of the site is, feeding that information directly to Google Search Console. This information needs to match the formatting that’s given to you — regarding the “name” and “content” attributes — during website setup.
Web Crawl Management
If you’re using a CMS platform like Blogger or WordPress, then each time you make changes to your website, the platform will submit an updated index to Google and other search engines. If you’re managing your website, you’ll need to manually request that your website be crawled when you make updates, for the search results page to reflect those changes.
Submitting a Crawl or Recrawl Request to Google
You can ask Google to recrawl both individual URLs or an entire sitemap. When you’re updating multiple pages at once, collecting and submitting them as a single sitemap is probably the best way to go.
Even if you’ve already built and submitted a sitemap before, you’ll still need to do it again after any changes. Google web crawlers won’t go over it again unless you ping them or until they notice the changes themselves, which can happen unpredictably. Simply indicate the updated pages with a <lastmod> tag in your XML files to tell the web crawler which sites to index again.
As for individual URLs, you can use a simple web crawler URL inspection tool to ask for indexing. It’ll give you the option of testing a live URL for your site that will let you test any updates you make without negatively impacting the website version already indexed.
Managing Crawl Budgets
You have to be mindful of crawl budgets, but only if you have a site with tens of thousands of pages or more. The World Wide Web is bigger than you think, and not even Google bots can spend unlimited amounts of time crawling your website. Two factors impact your crawl budget:
- Crawl Rate Limit: Google uses an algorithm called the “crawl capacity limit” to see how many connections its web crawler bots can make to your site without overwhelming your servers.
- Crawl Rate Demand: this is a measure of the time required to crawl and index your site in comparison to other websites. Popular URLs, infrequently updated URLs, and things like duplicated content can adversely affect your site’s crawl demand.
Web Crawl Errors
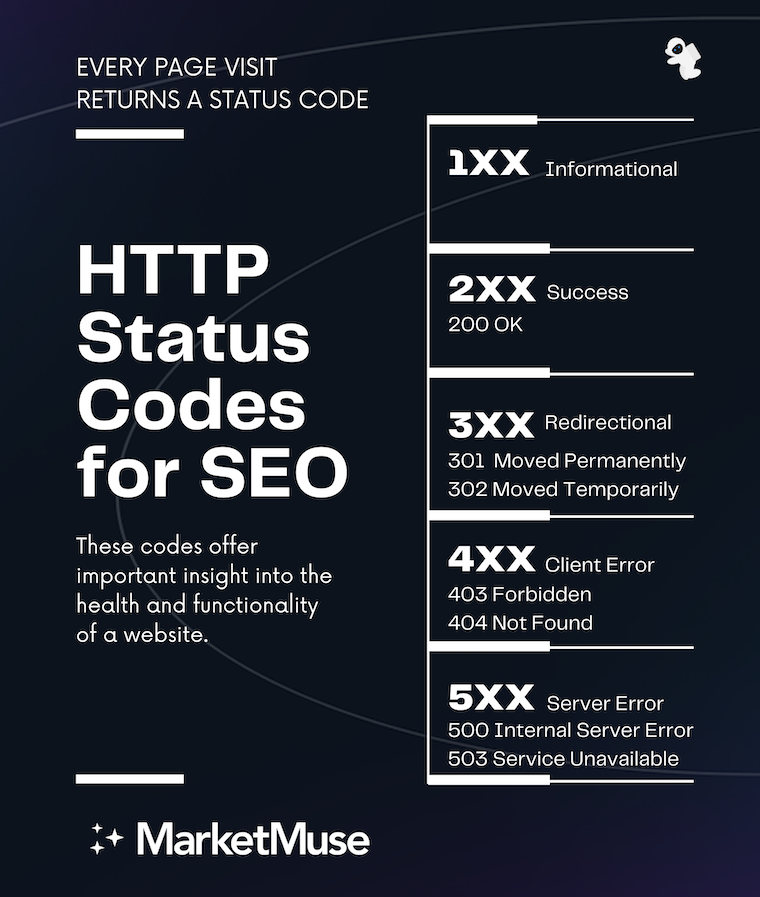
There are many reasons you might see an error code related to your site and Google search. HTTP status codes, for instance, come from the server that’s hosting your site.

They have a variety of meanings, with each falling under a specific category. Some of these are:
- 2xx (success): Codes like 200 or 201 mean that the web crawler has crawled your URL and cleared it for indexing.
- 3xx (redirects): If you see a redirect error on Google Search Console, that means Googlebot received at least 10 redirects with no content. 301 codes mean that the Googlebot was redirected with a strong signal that the redirect is canonical, whereas a 302 code is a redirect with a weak target signal.
- 4xx (client errors): 4xx errors aren’t considered for indexing. Any of these, from 400 to 429, will disallow the crawler from indexing, and if the problem persists, that URL can be removed from the index entirely.
- 5xx (server errors): 5xx codes won’t get your URL removed from the index right away, but it’ll happen eventually. 5xx errors mean the Googlebot’s crawl rate for your site is dramatically reduced, which is a sign you probably have broken URLs. When Google can’t reach a site due to network/DNS reasons, like happened during the recent Facebook service outage, Google sees this like a 5xx HTTP server error.
How to Remove Content From Google
Outdated content or negative content can both have a damaging effect on your online reputation. You can use Google’s Remove URL tool to remove unwanted content, but it won’t work for every circumstance. For example, to remove an image, you’ll need to block it with a customized robots.txt file added to your root directory.
If you own the property in question and you’re concerned about outdated or negative content, you can remove its content relatively easily:
- Set up a password for the page to make it private and inaccessible to search rankings.
- Add your noindex tag to the page.
- Manually remove the outdated content using your page’s administrator tools. This has the added benefit of removing the page from search engines that don’t adhere to noindex tags.
The removal process is a little more complicated if you’re concerned about your online reputation based on a property you don’t own. You can try contacting the webmaster and then, once they remove the negative content, use the outdated content removal tool to remove it permanently.
Filing a DMCA Copyright Violation Report
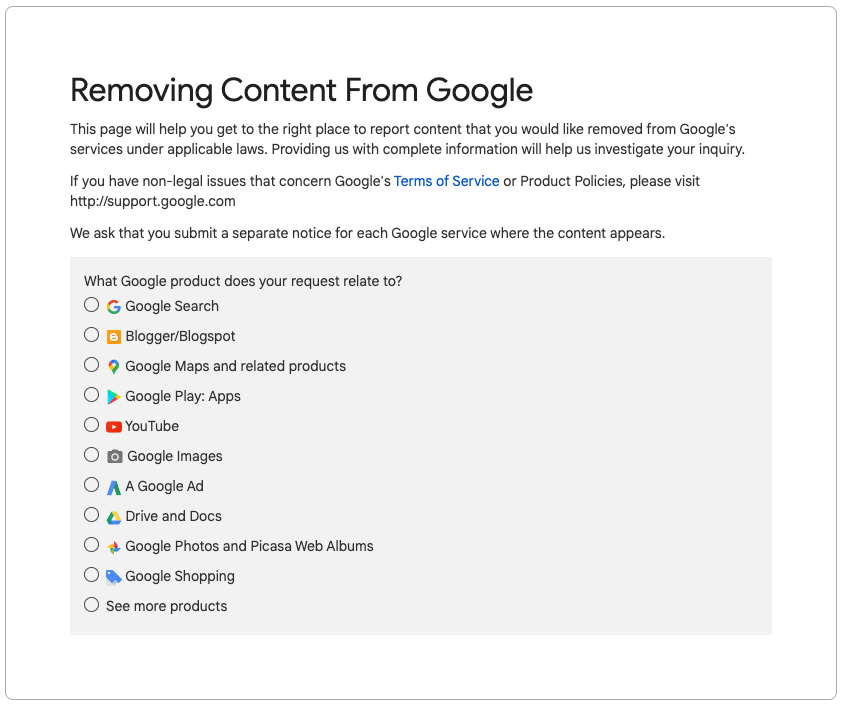
The process for filing a DMCA copyright violation report is pretty simple. Just fill out the DMCA Complaint Form to have copyrighted content removed from Google search results. You’ll need to fill out a separate form for each Google service on which the content appears.

Use one of the many free online plagiarism tools to help you find copyrighted content for removal — just make sure you own the content as there’s a fine for false requests.
Duplicate Content
There are a lot of legitimate reasons content on your page might be similar across several domains. For example, if you own an online store. When you have duplicate content, the best thing to do is create a canonical URL, which is the preferred URL for that cluster of content.
Canonical URLs are crawled more often, so designating it yourself would be a good idea. If you don’t, the Googlebot will sift through your duplicate content and choose a canonical site based on which one looks the most complete.
You don’t need to avoid duplicate content just for the sake of it. The part about Google applying a penalty to duplicate content is just an SEO myth.
In fact, there are legitimate reasons to keep duplicates. For instance, if you’re:
- Publishing a syndicated blog duplicated across multiple sites.
- Publishing a blog duplicated across several URLs.
- Creating web pages duplicated for mobile devices.
Even so, a duplicate content problem can hurt your SEO if it’s not properly tagged and indexed. Be mindful of duplicates and take proactive steps to avoid this issue. Good fixes include:
- 301 redirects that make crawlers understand the pages are duplicates.
- Use backlinks to your source URL when using syndicated content, or ask whoever syndicates your content to do so with a noindex tag to minimize external duplicate content.
- Fill each page with unique content and delete unnecessary duplicates.
- Use a duplicate content checker to find and delete duplicates you don’t need.
Redirects for SEO
Your site isn’t limited to one particular domain forever. When you change to a new domain, you can use a 301 redirect to retarget your old URL to a new URL. Users of the old URL will then automatically be sent to your new URL.
You can also create multiple 301 redirect URLs for multiple domains, which is especially useful when users access your site from different websites. The two basic kinds of redirects are:
- Permanent Redirects: when the redirect page appears in search results.
- Temporary Redirects: when the old URL appears in search results.
301 redirects can dramatically improve SEO in terms of PageRank. It hasn’t always been that way, but algorithm changes since 2019 mean you can use 301 redirects from multiple domains to direct organic web traffic to your site. You’ll need to clean old or broken links and update meta tags to take advantage of the SEO benefits, though.
Also, be sure your redirects have a purpose, as unnecessary redirects can be penalized.
More About Permanent and Temporary Redirects
Permanent 301 redirects are useful when you’re completely changing domains and have no need for the old URL. That means people searching for your site’s old domain will soon no longer find it in the rankings. A temporary redirect, on the other hand, will keep your old URL for more time, which is a useful fix when your website encounters an error and you need users to still be able to reach you.
Soft 404 Errors
Larger websites are somewhat prone to soft 404 errors. They occur when the page throws up an error message that says the page doesn’t exist, while at the same time giving a 2xx code indicating the page exists on the search engines.
This can happen when content on the page confuses the Googlebot. For instance, if you’re using meta tags that don’t correspond to any actual content on your website. Since it’s a 4xx error, the affected page will be removed from the search rankings.
Fixing it depends on what causes it. You can try:
- Customizing the 404 page in your configuration files by telling users who stumble across it where they can find the content they’re looking for.
- Use a 301 redirect to send the user to a comparable page. This will work if the 404 page contains content you can replicate elsewhere.
- If you think Googlebot wasn’t able to properly index the page, you can use the URL inspection tool to look at the page’s content and search for any errors. These could be things like scripts that don’t load correctly or a mistake in your robots.txt file.
Hreflang Attribute
The hreflang attribute is needed for websites using multiple languages. It’s known for being one of the more complicated parts of SEO, but it’s manageable. Basically, the hreflang attribute is a part of HTML that links multiple equivalent versions of your website to Google search results based on the user’s language and geographic data. Users of a Spanish-language browser visiting from a Spanish-speaking country, for example, will see a language-appropriate version of your website.
How do web crawlers know multiple language sites are versions of the same canonical site? You’ll need to designate a preferred canonical site with the (rel=“canonical”) tag and hreflang attribute so that Google understands you have a multi-regional site.
Hreflang Attribute for SEO
If you don’t use the hreflang attribute properly, Google will mistake your multi-regional website for duplicate content. The likely outcome is that only one of your language sites will be indexed, which will hurt your SEO rankings. However, if your pages are translations of one another, Google won’t consider them duplicate content and this won’t apply to you.
The href attribute directs the page to geotarget users, loading the correct language version of the site for the correct user. Since people expect websites to be in the same language they’re searching in, mistaken hreflang attributes will inflate your bounce rates when people come across your site and can’t understand a word.
It’s helpful to include easily accessible hyperlinks to other language versions of your site. That will help those who loaded the wrong language version to quickly find the site they were looking for.
The Takeaway
Helping Google understand your site is a vital function of SEO. Although it doesn’t influence rankings, it does have a direct impact. A page that can’t be crawled can’t be indexed — and if it’s not in the index, it can’t rank.