Image SEO: How to Optimize Images for Search
There’s a lot more to Search than 10 blue links. MozCast shows that over 36% of Searches include images.
Not to mention all the searches performed using Google Image Search. That’s an enormous amount of potential website engagement for brands. However, many website creators don’t spend time optimizing the images they use for their site — they believe that a simple alt text line is enough to please Google’s complex image SEO algorithm.
But Google’s algorithm grows smarter every day.
Fortunately, optimizing your website images for search doesn’t require countless hours of implementing complex SEO strategies and formulas. Image optimization for SEO requires a few easy steps. By focusing on such factors as image size, speed, description, and content, you can provide a better user experience and help Google define and organize your images.

Image Optimization for User Experience
While all SEO strategists want their content to rank high on Google, it’s important to create content that provides great UX (user experience). The better UX you provide, the higher likelihood of engagement and conversions. That’s why the best image optimization includes context, relevance, and site quality.
Here’s how you can go about optimizing images for user experience.
Consider image placement
Selecting where you place an image on a webpage influences context and relevance the most. Many site creators throw in an image or two in random sections of their web page as a way of breaking up text. But doing this can end up confusing and distracting your audience. Images should be placed near the most relevant text to provide context to visitors. Notice how the image in the next section relates to the text. This also helps Google serve appropriate images to related search queries.
Use high-quality and unique images
Stock photos are many website owners’ go-to’s. After all, they’re often free, easy to use, and there’s bound to be one or two that are relevant to your site. The problem is that every other website creator is likely doing the same thing, meaning the stock images you use are probably found on ten other sites like yours.
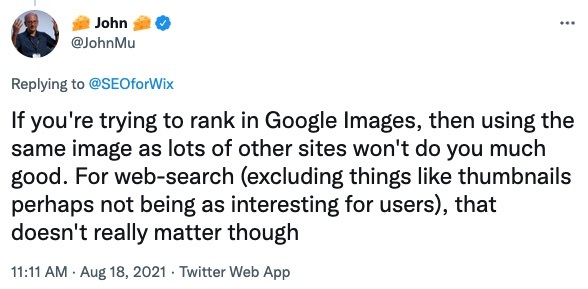
Like Google’s John Mueller explains, “if you’re trying to rank in Google Images, then using the same image as lots of other sites won’t do you much good.”
As part of your optimization workflow, consider creating your own unique images that are used purely for your site. Investing in high-quality photos can lead to a much higher engagement rate, especially if you have an eCommerce shop where alluring product photos are a necessity.
Ensure mobile-friendliness
Mobile use accounts for over 50% of all web traffic, so it’s imperative that you make your images mobile-friendly. Google offers a simple mobile-friendly test that scans your web page and tests it for mobile use, offering you advice on how you can better optimize any images. For pages failing this test, consider using responsive images that scale to size depending on which device a user accesses it with.
Typically, a combination of HTML, CSS, and Javascript, are used to serve the correct size of image based on the device. Most sites are already mobile-friendly. If you’re working on a very old site or aren’t sure, just adjust the width of your web browser. You should see the images scale as the browser window size changes. You can read more about creating responsive images in this guide.
Don’t forget site quality
Image optimization is just one part of ensuring a great user experience. Having other high-quality content on your web page further increases its relevance and usefulness. Google looks at many different factors when considering site quality, including security, expertise, value, trustworthiness, and organization. The more developed your web page is as a whole, the greater the benefit to people, and the more likely that Google will take an interest.
How to Optimize Images for Speed
According to a Google report, the probability of visitors who navigate away from a web page increases by 32% as “page load time goes from 1 second to 3 seconds.” This high statistic shows that load speed is an influential factor in web page success. And nothing slows a page down more than an image that takes too long to load.
Luckily, there are a number of ways that you can optimize your image for better page load speed.
Choose the right image format
Choosing the right image format is the first step in ensuring your image will load both swiftly and properly. But how do you determine which image format is best for speed optimization? The first step is to examine what options are available to you as Google-supported image formats.
- PNG: PNG formats are typically used for graphics, screenshots, or images that require preservation of background transparency.
- JPEG: The most well-known of the image formats, JPEGS are good for large photos or illustrations.
- SVG: Best for any custom logos or icons that can be viewed in different sizes.
- WebP: The best option for high-quality results for images of a smaller size.
- BMP: Considered more of an outdated option, BMP is used for bitmap images.
- GIF: For moving graphics or animation.
There is a big debate with image optimization on whether GIFs or videos are better from an optimization standpoint. Both formats have their advantages and disadvantages. Videos tend to receive some of the highest engagement — nearly 70% of consumers are more likely to buy a product after watching a video about it. At the same time, videos tend to take longer to load than gifs, which can slow down page speed. Which one to choose will depend on the other elements that are on your web page. If it’s text-heavy, consider just using GIFs. If you have less on your page, you’re safe to use video without sacrificing load speed.
Remember image compression rate
Once you have the right format picked out, you also have to consider the image compression rate. Too much image compression can lead to poor image quality, while too little compression will make for an enormous file size. Many photo-editing sites and apps allow you to experiment with compression sizes. Google has provided a guide on compression methods that you can apply to your images, covering terms like lossy compression.
Keep in mind that there is no “right answer” for what your compression image file size should look like — but eighty percent is a good place to start. You’re very unlikely to notice any degradation in image quality, except in the most critical of cases.
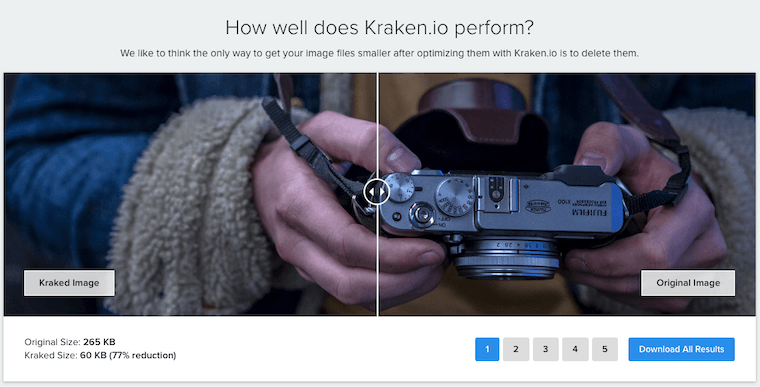
Consider using a WordPress plugin for image optimization. For the MarketMuse blog we use Kraken. Once set up, it automatically compresses images as they are uploaded to the CMS. This is perfect for creating an efficient workflow.
Pick the right image dimensions
Serving images with the right dimensions is the last step to ensuring images don’t negatively impact page load speed and user-friendliness. Serving over-sized images is a waste of bandwidth and adds unnecessary overhead. Most content management systems will take care of this for you but you still need to have an appropriately sized original image to begin with.
The Chrome browser inspection tool can help you quickly determine the appropriate size. The rendered size is the dimensions at which the image is displayed. On the MarketMuse blog, the column width is 760 pixels, which is effectively the maximum width at which an image will display. The intrinsic size is the size of the image that was uploaded to WordPress (our CMS). Usually, the intrinsic width shouldn’t be more than the rendered one.
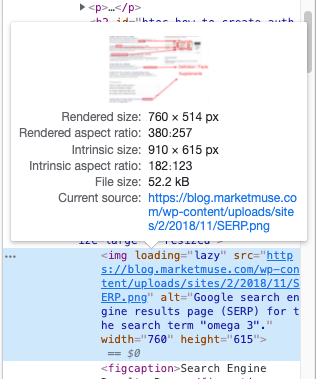
The exception to the rule is screenshots where you want visitors to see all the detail that they’ll miss in a smaller size image. For example, on the MarketMuse blog we often show screenshots of our platform. But it’s often difficult to discern particular features with any precision due to the 760-pixel column width restriction.
So, the original image (in this case 1644 pixels wide) is uploaded to WordPress and served in the smaller 760-pixel width size. When readers click on the image, it opens up to the full size where the details can be seen in all their glory.
Quick note: When image compression isn’t enough, consider using a CDN (content delivery network). A CDN is a geographically distributed group of servers which work together to provide fast delivery of Internet content. That difference in speed can be quite substantial and the cost is minimal and in some cases free. Read this guide by Cloudflare to learn more.
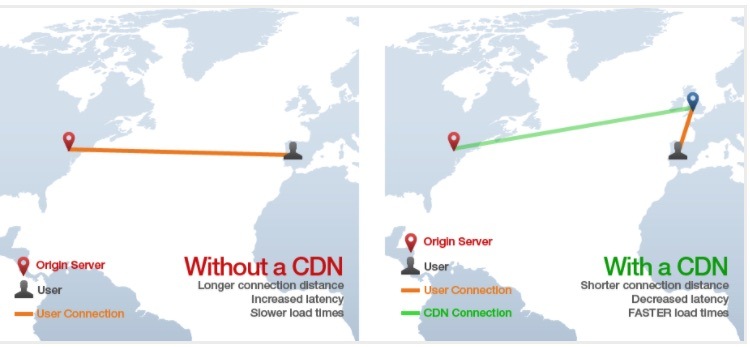
Image SEO for Discovery
Images can’t rank on Google if they’re not discovered. Two items can help with this regard; an image sitemap, and semantic markups.
Utilize image sitemaps
What’s an image sitemap, and how does it help Google discover your images? An image sitemap is an XML sitemap dedicated to listing all the image URLs on a site. A sitemap is essentially a blueprint that helps Google find, understand, and crawl the relevant URLs on your site.
Technically, you don’t need a sitemap. You can just submit URLs through Google Search Console. But it’s far more efficient to have one, specially when it gets updated automatically as new content goes live.
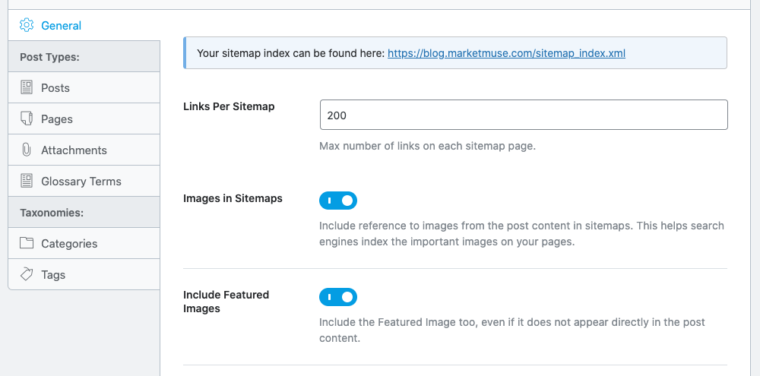
For the MarketMuse blog, we employ RankMath, a WordPress plugin that handles sitemaps among a host of other SEO tasks. It’s pretty much set and forget. This guide from Google on creating a sitemap can be helpful should you need to create one manually.
Consider semantic markup
Initially, the phrase “semantic markup” may seem initially complicated. Thankfully, it’s not some overly complex software that you have to worry about. Semantic markup refers to the content markup, or HTML, of a specific page. It helps humans and search engines better understand the content on a page. This makes it ideal for image optimization.
All HTML should convey information that describes your site for both computers and human beings. Read Google’s take on semantic markups for HTML for the best tips and tricks on the matter.
SEO Image Optimization for Indexing
There are a few things you can do to ensure Google accurately indexes your images.
Get descriptive
Including descriptive titles, descriptions, and file names as part of your site helps Google and humans better understand your site. The best way to ensure that all of your text elements are descriptive is to strategically place your keywords in the text that will be featured prominently in the search engine. Moreover, keep text descriptions short but effective — avoiding using symbols like underscores, as Google algorithms don’t recognize them. Every single word you use should serve a purpose for a search result.
Incorporate structured data
To help you achieve rich results on Google, include structured data in your images where possible. With rich results, Google can provide badges that give users further relevant information about your page while they are performing an Image Search. Google supports structured data for products, videos, and recipes.
Furthermore, Google has in-depth structured data guidelines that outline the entire process of incorporating structured data into your image SEO, which you can read more about here. The most important tips are to keep your information and data up-to-date, and don’t make up irrelevant data that may be misleading to users.
Use alt tags
If an image doesn’t load on your page, alt text will appear instead that helps to describe your image. Also, for visually impaired individuals accessing your site, this alt tag can also help them understand what’s in the Google image. Lastly, using the right alt text provides some additional information to help Google better understand the image and the page on which it resides.

There are a few key tips for writing good alt text that optimize your image.
- Use your target keyword(s): Adding your target keywords in alt text is the primary way to help associate your site with relevant topics and boost your visibility on a search engine.
- Keep it short: 80 to 125 characters (around 16 words) for maximum accessibility. Up to 50 words for ranking in Google Image Search.
- Get rid of unnecessary phrases: Never start an alt tag with phrases like “This is an image of ____” or “This is a picture of ____.” This is redundant and takes up pivotal space. Go straight to the source of the image for brevity and clarity.
Quick note: A common question when it comes to indexing is whether Google indexes CSS images. The answer is no. Google’s John Mueller stated that you’re better off using normal image tags and with the alt attribute pointing to the image.
The Takeaway
Image optimization for image search is another SEO strategy to implement as you work on creating useful, relevant web pages. As you can see, image SEO covers many facets. To rank well on Google Image Search, you need to consider image size, speed, content, format, and related data. Moreover, making sure you create descriptive alt text, titles, and on-page text helps in making a better web page overall. Done correctly, image optimization can lead to improved search ranking and a website that users will come back to time and time again.
What you should do now
When you’re ready… here are 3 ways we can help you publish better content, faster:
- Book time with MarketMuse Schedule a live demo with one of our strategists to see how MarketMuse can help your team reach their content goals.
- If you’d like to learn how to create better content faster, visit our blog. It’s full of resources to help scale content.
- If you know another marketer who’d enjoy reading this page, share it with them via email, LinkedIn, Twitter, or Facebook.

